Processing of solar CCD images taken in H-alpha light
The procedure outlined below is optimized for my own imaging setup (f=640 mm, ST10XE camera), so be prepared to change it to accomodate your own needs.
I got the inspirational starting point for this work from Russel Croman, please go to his homepage to see how
excellent image processing is done!
Here is a typical raw image taken with my setup using a Coronado hydrogen-alpha filter:
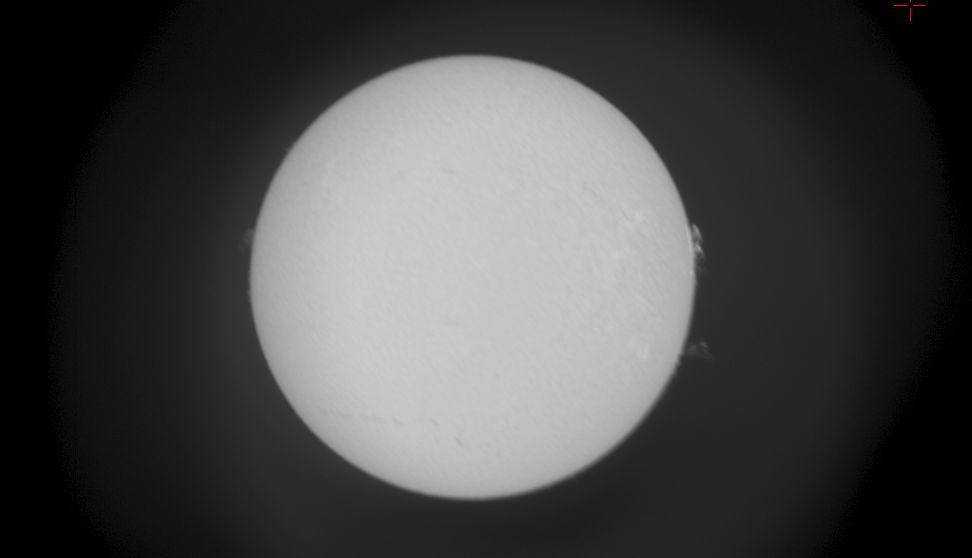
Evidently, this image leaves alot to be desired. First, the contrast of the photosphere is lousy. Second, there is an asymmetrical halo of scattered light
around the solar disc, which makes it difficult to bring out prominences and CME's. A number of other problems are present - but not visible above, such as
limb darkening, which later on in the processing sequence will mask the features we want to enhance. The procedure outlined below works well for me to deal
with these problems, I hope you can find inspiration from it, like I did from Russel Croman's outline
(see the bottom that page for details on his solar processing).
A (MIRA6):
- If you have multiple images: scale them to common average value of ~10000 for the solar disc.
- Use a dark frame to make a hot pixel mask (I set the tigger levels so that ~1% of all pixels are masked), apply the mask.
- Make a new image set, consisting of three images rotated 0,+v,-v degrees around the center of the solar disk. The angle v (typically in the order of
~10 degrees) is the smallest angle that rotates the widest prominence so that it does not overlap with itself or other prominences in the other images of
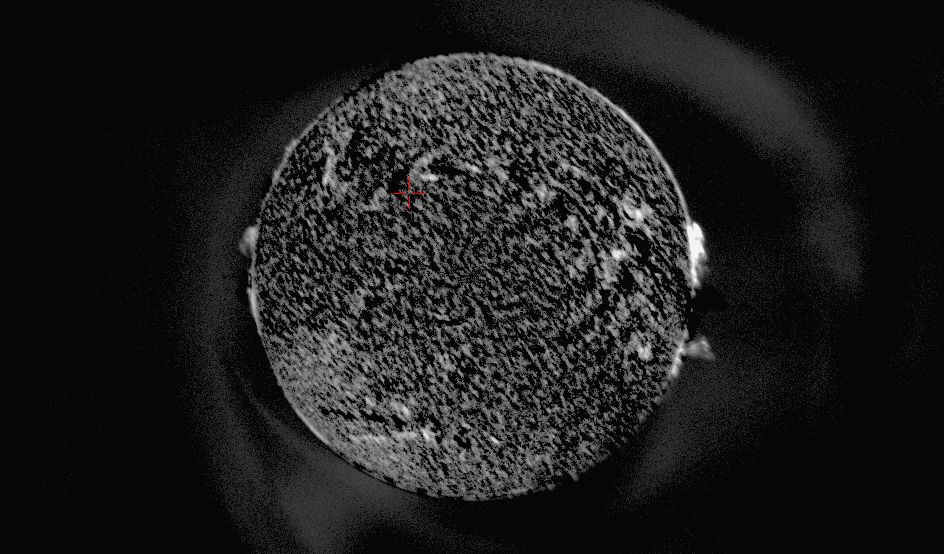
the set. This image set is then min. combined and subtracted from the non-rotated version. Multiply by 10, convert to 16bit, save as '_backcor16bit'. As
illustrated below this produces an image which is much better for showing prominences and the like, outside the photosphere.
- On image from step A2: convert to 16bit, save as '_16bit'.
If clouds are partially obscuring the solar disc and you have a similar image (taken a moment earlier/later) without clouds then perform the steps
marked with red:
B (MIRA6):
- First align the cloudless image to the cloudy image from step A2.
- Divide cloudy image with cloudless image, output in 32 bit real.
- Despeckle
- Select a box containing the darkest clouded region on the solar disk, avoiding any parts of the rim artifacts, do stats on this region, note down the
min. pixel value.
- Do the same thing on the brightest region, note down max. pixel value.
- Undo despeckle.
- Subtract the min. value from image
- Divide image by (max.-min.) value
- Multiply by 255 while converting to 8 bit integer
- Save as '_cloudflat'
C (PS7):
- In quick mask mode, carefully position a circle with 880 pixel diameter on sun
- Enter normal mode, expand 3 pixels, delete surroundings
- Invert selection, feather 9 pixels, do a gaussian blur (radius 9)
- Invert selection, expand 9 pixels, do a radial blur (5 degrees, spin mode, quality good)
- Deselect
- In quick mask mode, carefully position a circle with 880 pixel diameter on sun
- Enter normal mode, expand 3 pixels, delete surroundings
- Deselect
- Save (fits) as '_cloudflatPS'
D (MIRA6):
- Set alpha equal to the ratio min/max noted down in steps B4 and B5.
- Determine the min. and max. pixel values as in B4 and B5 for the '_cloudflatPS' image
- Add the value (alpha*max-min)/(1-alpha) and convert to 32 bit real
- Divide by the new maximum value in the image. You now have a flat that can remove the cloud features originally present, however the pixel values
outside the solar disk, such as in flares, or very close to the edge will be distorted.
- Flat field the original image from step A2, convert to 16 bit, save as '_16bit_cloudcorrected'. You will also need the uncorrected image from step A4
to blend with the corrected image later. Continue with these two images in parallel, until the next note appears on this topic.
Some key elements of the cloud correction process outlined here are shown below:

E (AIP4WIN):
- Open '_16bit'
- Do Van Cittert denvolution, PSF=9 (gaussian), 1 iteration
- Save file under same name
- If a cloudcorrected image is present: load the '_16bit_cloudcorrected' file and do the previous three steps on it
F (MIRA6):
- Open '_16bit' (do this and the following step on the '_16bit_cloudcorrected' file, too)
- Multiply by 2
- If clouds were obscuring solar disk: load both photosphere images into a set
- On non-cloudcorrected image: expand image size to 4368x1472, bckgnd value=0, x-offset=2184, y-offset=0
- On other image: expand image size to 4368x1472, backgnd value=0, x-offset=0, y-offset=0
- Combine images: master image = '_16bit', method=sum, data type=same as original
- Save as '_16bit
G (PS7):
- Open '_16bit'
- unsharp mask, r=250, 10% (reduce limb darkening)
- unsharp mask, r=3, 80% (sharpen)
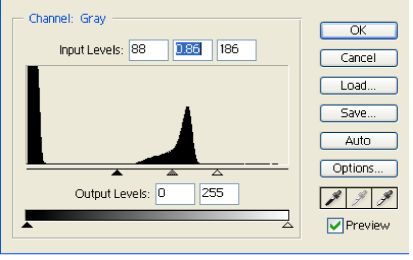
- three times curves
- levels, move low point to somewhat below edge of solar disk, high point correspondingly above same, move midpoint slightly towards high, as shown in
this figure.
- use history brush and undo levels around any very bright CME's to avoid too much saturation here (if operating on a two-disk
image, then do this operation on the un-corrected disk)
- if the photosphere limb circumference seems of uneven darkness: use undo brush with r=150, opacity 25%, flow 45% and carefully sweep over the dark
areas (if operating on a two-disk image, then do this operation on both disks)
- convert to 8-bit, save as base layer in a new file
- select the cloud-corrected image half with the crop tool (2184 x 1472), crop it, select all and copy to buffer
- undo crop and do a similar crop on the other image half
- paste the cloud-correct image from the buffer to form a new layer
- check that the two images are aligned properly
- in quick mask mode (top layer), carefully position a circle with 880 pixel diameter on sun
- go back to normal mode, expand 10 pixels, feather 6, delete; check that the entire rim looks good - if not go back and try again with different
expand/feather values
- deselect and flatten; now you should have an image of the photosphere corrected for clouds and without rim artifacts!
- load background subtracted image
- do ~4 times curves
- if needed: use clone stamp to correct any black areas in the vicinity of the solar disk ('echos' from rotated prominences, an example may be
seen at the three'o'clock position on the image above)
- convert to 8 bits
- despeckle
- select with lasso any backgnd areas that are too bright, feather 5, move midpoint slightly upwards in levels to achieve a darkness similar to
surroundings
- select all, copy to buffer
- paste in photosphere image
- in quick mask mode, carefully position a circle with 880 pixel diameter on sun
- go back to normal mode, invert selection, use lasso to add rim glow and other unwanted features to selection, feather 6 pixels, delete (make sure
that you are happy with the border between the two layers, if not then go back and add or subtract from the selection and delete again. This step is
critical!
- Before unselecting, go to levels and darken fully (or nearly fully)
- Invert selection, daken slightly in levels to gid rid of residual background
- use delete brush (or lasso) to delete (darken) any extra areas around photosphere disk and/or bright flares
- convert both layers to RGB
- on photosphere layer: do curves where B is zero, R curves upwards, G downwards; until satisfied with color (if a bright flare is present that you
want to be white: deselect and feather it beforehand and do it seperately afterwards)
- on prominences: do curves B zero, R unchanged, G high point lowered, until satisfied
- if nessescary despekle or sharpen slightly (5-20%) photosphere layer
- if there are other solar images to which this image must match in color: check now that both layers match OK
- flatten layers
- crop to taste
Be prepared to pay attention to the intermediate results and tweak things accordingly based on frequent comparisons with the raw image. If all goes
well you should have an image like this:
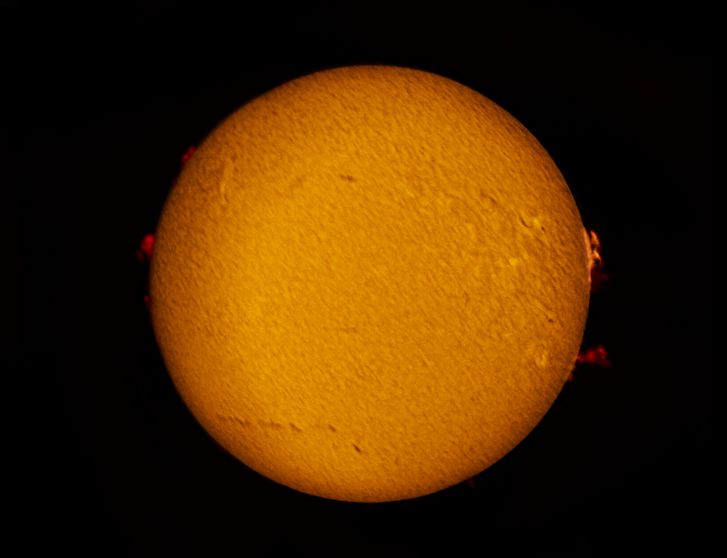
Note that this way of processing the raw image is highly subjective, the original scientific value is replaced by something based upon
personal aesthetics!
Here's my main page where you can see more of the pictures I have taken so far.
Comments greatly appreciated! (svlgrd@com.dtu.dk)