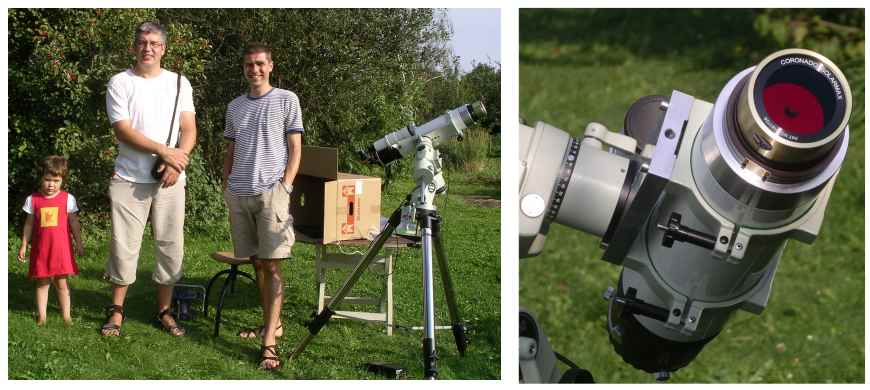
from left: Marie, astro-Michael and me
Solar imaging in H-alpha light using a web-cam
A few general considerations that will help:
- Use a polar aligned mount (align the night before for most accuracy). During a, say 60 sec, avi sequence it is not nice
if the field-of-view drifts significantly.
- Get a box to shade your PC. Increases screen visibility, reduces risc of CPU over-heating!
- Orient web-cam so that camera axes roughly correspond to RA, Decl. Makes it easier to build a mosaic.
- For best seeing: work early in the morning when the air is usually cooler and calmer than later in the day.
- Spend a few minutes to change the operation mode of the ToUcam to CONR-mode. Here's why!
The equipment I use is a 60 mm H-alpha Coronado filter set (2.4 arcsec FWHM res) mounted on a F=640 mm refractor and a Phillips
ToUcam. The resulting image scale is 1.8 arcsec/pixel.
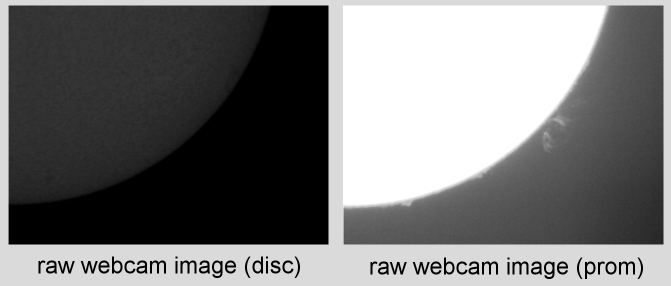
For acquisition I use the software (Vrecord) that comes with the webcam. I typically take an avi of the disc and one of the background,
to get prominences. Webcam settings: 5 FPS, brightness=100%, gamma=10% (50% on
prominences), b&w mode on, 1/2500 sec (1/100 on prominences), white balance = 60%/20%, 640x480 pixels. For a typical sequence I usually
take a 60 second avi, i.e. resulting in ~450 individual frames. With the webcam settings given above the image will look very dark on the
monitor. In my experience this is needed to avoid detector saturation that will give the sun a 'flat' appearence. During focussing you
should use whatever settings gives you the most pleasing real-time image. Here is an example of typical raw webcam images optimized for
the solar disc and for prominences:
Below, the processing steps I use are described. For image selection and alignment I use K3CCDtools, for the remaining
processing Mira and Photoshop. Other software products can also be used with good succes. I usually build mosaics consisting of several
disc/prominence images; if you are not doing this just omit the steps marked in red. Many of the exact settings are based on my
equipment and personal taste; just use these notes as guidelines for your own experimentation!
A (K3CCDtools):
- Use 'planetary wizard' to select sharpest frames, aligning and stacking. Wizard settings I use: normal mode, typically align box
size=256 for disc and 128 for prominence frames, typically put the box at a 45 deg limb with a good deal disc on it or a good prominence,
if a 45 deg disc is not available and a spot is I'd use the spot and the smallest box.
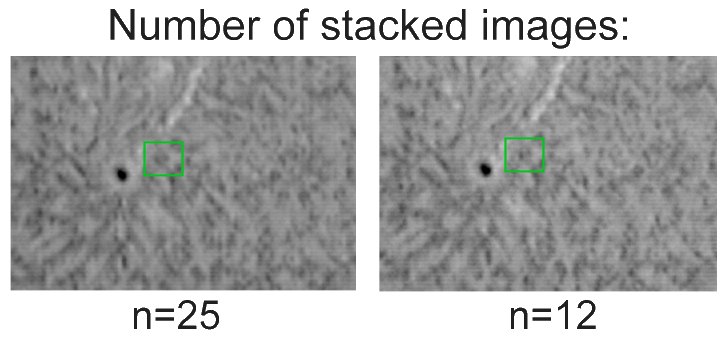
- For combining I use 2x mode=ON, and only a small number of the sharpest frames, such as n=4-12. Below you can see how using too
many frames for stacking can reduce the resolution (note the detail in the green box).
- Save the stacked image as a 16-bit fits file.
B (MIRA6):
- Multiply each image so that max=15000 (for disc images) or just by a factor of 10 (for prom images).
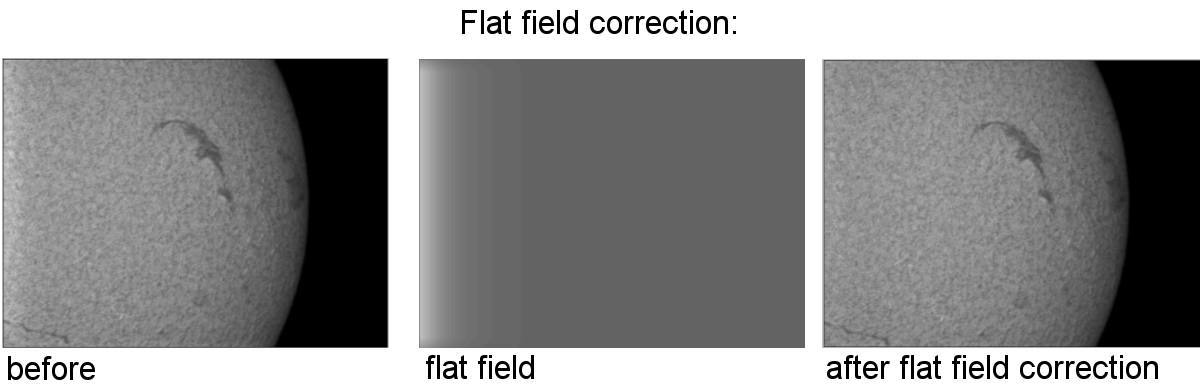
- If needed apply a flat field correction to each image (before doing this crop all images, incl. the flat, to
same size). I usually only have to do this on my solar disc images and not on the prominence images. An example is shown below, where I use
a specially constructed flat field
image to correct for an increased signal along the left side of the imaging chip:
- Save output in 16 bit FITS.
C (Photoshop7-DISC):
If building a mosaic: start with the frame containing the most intense feature (should be made white).
- curves 90/255
- curves 178/121 (if these two curve agjustments are too much, undo and reduce them a little; most intense feature should be just a
bit white). Make sure to use the same adjustments on all images of a mosaic.
- levels 0/1/180 (just a little down into the highest pixels, do the same on all images)
- convert to 8 bits/channel
- de-interlace (even fields, interpolation) - make sure interlace lines disappear, if not try 'odd fields' option. Sometimes both may be
needed. An example of de-interlacing is shown below:

- unsharp mask 50/3.6/0
- convert to RGB color
D (Photoshop7-DISC MOSAIC):
- make a new image (2600 pixels square for 3x2 full disc mosaic, RGB, transparent bckgnd)
- select one mosaic frame, going no closer than ~20 pixels from the edges that face adjacent mosaic frames
- feather 15 pixels
- copy into a layer on new image, move to appropriate position
- paste and align the remaining frames into seperate layers (created automatically as you paste), using limited select and feathering
as described above
- if needed, paste into a new layer a black circle (2085 pixels diameter) on top to refine alignment (set opacity to zero, use white
line on edges, move disc images about to fit)
- time to equalize color and brightness: choose a master frame, use levels and/or curves to adjust until OK
- going around the disc, select remaining mosaic frame and do the same, i.e. matching them to the previous
- flatten image
- do the same to former corners/edges that are a bit too dark
- check if some frames / areas need additional unsharp mask, apply if needed. This is sometimes needed in the mosaic overlap regions.
- curves R:125/180, G:50/20, B:225/1 (just so that small patches of pure white remain in most intense parts)
E (Photoshop7-PROMINENCES):
- curves 49/234
- curves 213/170 (if these two curves are too much, undo and reduce them a little; most intense feature should be white)
- levels 0/1/180 (just a little down into the highest pixels)
- convert to 8 bits/channel
- de-interlace (even fields, interpolation) (if lines don't go away: try both odd and even)
- unsharp mask 80/2.4/1
- convert to RGB color
F (Photoshop7-PROMINENCE MOSAIC):
- make new image (2600 pixels square for 3x2 full disc mosaic, RGB, transparent bckgnd)
- select one mosaic frame, going no closer than ~20 pixels from the edges that face adjacent mosaic frames
- feather 20 pixels
- copy into a layer on new image, move to appropriate position
- in a new layer make a cicle 2085 pixels in diameter, use it as a guide to aligning to remaining frames
- paste and align the remaining frames into seperate layers (created automatically as you paste), using limited select and feathering
as described above
- delete the dark circle layer and fine align using the limb
- make new layer and make new dark circle 2085 pixel diameter to check alignment
- time to equalize backgnds: choose a master frame, use levels or curves to increase lowpoint until bckgnd looks OK with respect to
adjacent frames
- going around the disc, select remaining mosaic frame and do the same, i.e. matching them to the previous image you adjusted
- flatten image
- curves R:125/180, G:90/0 (just a touch of yellow on strongest prominences), B:225/1
G (Photoshop7-COMPOSITE OF DISC AND PROMINENCE IMAGES:):
- use magic wand (tolerance=40) and click on backgnd on disc image
- invert selection, feather 4 pixels
- copy, paste into the prominence image
- align disc to prom
- if needed: use curves to darken prom backgnd to a level that appears nice
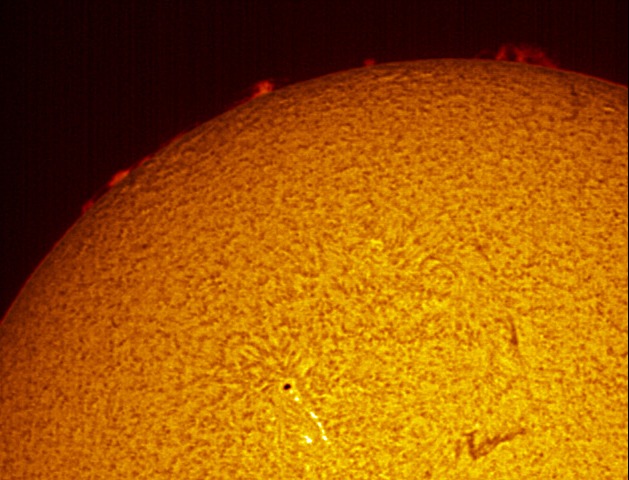
Be prepared to pay attention to the intermediate results and tweak things according to your own taste and equipment!
When all goes well I get a final image like this:
Here's my main page where you can see more of the pictures I have taken so far.
Comments greatly appreciated! (mikael@leif.org)